Hey guys! Remember Janus, the Ken doll with a prosthetic leg? Well, here comes another doll amputee story!
Today's patient is a very old Barbie doll - actually, she was my first Barbie (I named her Jen) and is the oldest one I own. Years of play had rendered her right knee unbendable. I was willing to put up with this, but when the rubber on her foot dried out so bad her toe broke off, I decided to use Jen to test out some new prosthetic leg techniques.
***Warning! If you're squeamish about doll surgery, you may not want to read this post.***

The offending toe.
Before messing with her leg, I decided to do Jen's faceup. I used boiling water to take off her head...

...removed her hair...
 ... and wiped off her face paint with 100% acetone nail polish remover.
Since she's really a technique-tester doll, I used some cheap hair from a red Halloween wig to reroot.

Here are the first stages of her acrylic faceup.
And here's the result! This was my first attempt at repainting a Barbie doll face. I have to say, it's way harder to paint on a Barbie than a Monster High doll. Jen's features are so tiny! But I managed in the end.
Now for the leg. I got out a bunch of dried-up ballpoint pens from my junk stash.
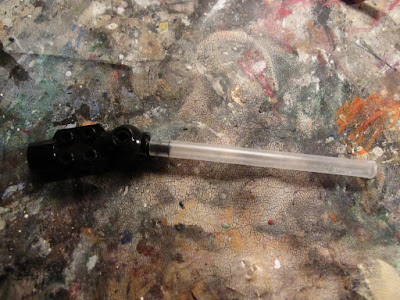
 I also got out another Lego ball hinge joint, the same as the one I used for Janus.
 Luckily, a piece of plastic tube from inside one of the pens fit perfectly onto the bottom peg of the joint.
I used Jen's leg to measure and cut the tube.
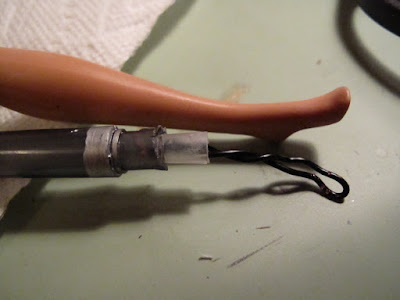
 Then, I found two more pieces of plastic tube to fit inside each other. These are hard plastic from the outside of two different pens.
I glued all the tubing together, sanded down the top of the upper tube, and glued it to the bottom of the knee joint.
Next, I marked on the leg where the leg would be attached...
 ...and cut the leg off with an X-Acto knife. The rubber was easy to get through, but the plastic skeleton underneath was really stiff.
 I also had to hollow out the end of Jen's thigh to make room for the cylindrical attachment on the end of the joint piece. I could have cut that part off the joint, but this way, the join between thigh and prosthetic is stronger.
 I also made a slit so that the plastic can push out a little bit, making it easier to get the joint glued in.
 I hot-glued the joint in place (it detaches from the lower half, which makes things easier) and used a twist tie to keep everything tight until the glue dried.
 To smooth out the surface of the leg, I used hot-glue and pieces of plastic packaging to fill in the gaps on the Lego piece.
 I painted over everything with black glossy enamel paint.
To cover the join between the thigh and prosthetic, I glued a strip of black faux leather (cut from an old purse) around the leg and filled the gap at the bottom with more paint.

For the "carbon fiber" running foot, I first hot-glued a wire armature into the bottom of the leg.
 Then, I covered the armature with hot glue, making sure to keep everything as smooth as possible.
 One more coat of black enamel, and the leg is finished!
I decided to glue a red mini-gem into the hole in the upper leg, just to add some sparkle.

I whipped up some workout clothes, and Jen's ready to rumble!
Jen proves that you don't need to be symmetrical to be awesome! Creating her was difficult for sure, but I love a good challenge. And now that she's finished, I hope she will inspire someone else to give an old, damaged doll a new lease on life.
Questions and comments are always welcome at modelhorsemagic@gmail.com, and stay tuned for my next update!


No comments:
Post a Comment