Here's what she looked like once I'd gotten her out of the shipping box and taken off the dress.

Her hair was such a mess! I boilwashed, conditioned, and combed it....
...But it was still awful.

I tried to salvage it with soap, Goo Gone, and other substances. It remained sticky. Besides, taking a closer look at the roots, I could see that a lot of it had been pulled out and/or trimmed, so it was very thin.

Here's her face before.

She was also missing an arm, which had been replaced with one from an Operetta doll. It didn't match at all!
But I didn't have any extra Rochelle arms, so I had to keep it.
It's also hard to see, but the tip of her right ear crest had been cut or broken off.
Off comes the makeup with 100% acetone nail polish remover.
It's not safe to use acetone on Monster High dolls' plastic bodies, so I sanded off Operetta's tattoo and sealed the arm with clear matte acrylic spray.
Haircut time!

Take off the scalp paint with acetone as well.
My idea for this doll was to create a kelpie girl with seaweed dreadlocks. I found a ball of variegated green wool yarn left over from a sweater that was the perfect set of shades!
Strands of yarn look exactly like tiny dreadlocks, so you don't even have to make wefts.

Cut off a length of yarn about the right length...
...and superglue it to the back of her head. I didn't want to root because that would make the yarn stick out in the back, and yarn doesn't respond to heat treatment the same way conventional doll hair does.

Here she is with one row in place.
At this point I decided to paint her scalp dark green, so any spaces between rows would be invisible.


I also repaired the broken ear tip with hot glue.

Continue to add rows...

...working around the ears, and gluing some hair to the side of the head in front, so it falls the right way.

There's still a bald spot in front, and the hairline is blank. Supergluing on more yarn would leave a visible seam.

Time to break out the rooting tool! Cut lengths of yarn that are twice as long as the desired hair length...
...and unravel the yarn into two plies, so it's thinner.
Make a loop in the middle (excuse my paint-y fingers)...
...loop it through your warping tool...

...and continue to root like you would with regular doll hair.
You may have to punch some new holes with a big needle to even out the hair under the ears.

Much better! Her hairline is about half done here.
Here you can see how tightly I rooted the hair around the ears. You can also see the first steps of sanding and painting the ear repair.

Finally, all the hair is finished. I couldn't be happier! It turned out just like I'd hoped. It really looks like seaweed!


Soak the hair in hot water with a bit of conditioner to soften and felt the wool just a bit. This makes it look fluffier and less stringy.
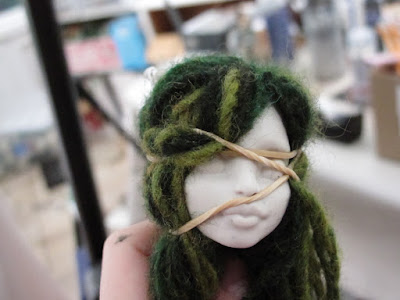
While it dries, train the hair around the face with rubber bands.

Squeeze some glue inside the head, coating all the rooted parts, to make them more secure.
Wait for it to dry, and pop the head back on.

You may have to trim it a bit, especially in the back.
The hair's finished! How exciting!

To prepare for the faceup, push the hair back, wrap with paper towels, and pin or tape it in place.

Before starting the face, I mixed a batch of Rochelle-colored acrylic and painted her replaced left arm to match the rest of her body.
I also finished the ear.
After a few coats of Mr. Super Clear sealant and green pastel, her face contours are starting to emerge.

Here she is with pencils and pastels finished.

And finally, acrylic paint. I added glossy sealant on her lips and eyes to give her a bit more life.
Take down her hair, and....
Isn't that better?
I haven't decided on a name for her yet, but I'm leaning towards Ness. If you have a better idea, I'd love to hear it! Any other questions, comments, feedback, or awful puns are always welcome at my email: modelhorsemagic@gmail.com. Thanks for reading, and stay tuned for more doll excitement!


